I found something today...something that I was certain was gone. Something that I wasn't even looking for. To anyone who isn't a member of my household, it's absolutely meaningless but when I saw it I was just floored.
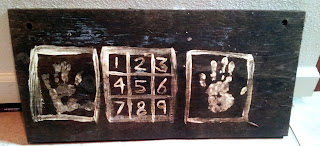
Nearly 2 years ago at our old house, my husband helped the boys put together a super top secret (no girls aloud) lair. But since I'm mommy I got a free pass to enter. Or it could have just been that they needed an evil villain to fight...I don't know. When you entered their top secret lair there were a couple planks of wood that were hung from a tree by rope. On one it said "top secret" and on the other was a "key pad" and 2 "hand scanners." About a month and a half before we moved some neighbor kids went up into the area and trashed everything (teens...pft). After that the boys didn't play up there any more. Admittedly, we also didn't clean up the mess that the teens left. The rope, planks, and anything else that was up there at the time was left to nature.
Fast forward to today...almost a year and a half after the destruction of the secret lair and our move to a neighboring town. I still work not far from where we used to live. There are a lot of really great hills near by and I thought I would go for a walk today. As I got near the area where we used to live I saw something on the ground next to the sidewalk. I was standing across the street walking towards it and it took a couple of seconds for my brain to register what it was. There, laying on top of the ground, nothing on it, barely dirty, still painted clear as day, was the plank of wood with the boys hand prints on it and the key pad.
Keep in mind its been well over a year since anyone of us has seen this! Not to mention that our old landlord had the hill where the top secret lair was cleaned and cleared shortly after we moved out. So to say I was surprised to see this just sitting there is a terrible understatement. I sent my husband a quick message with a picture of it and explained to him that the way it was sitting, the lack of debris on it, its good condition...it felt like someone had walked by a few minutes before I did and sat it there for me to find. It was a mind blowing experience for me cause I really don't know how it still exists.
Needless to say I lugged it all the way back to my office and its sitting on the floor next to me right now. The child like part of me is afraid that if I look away it will disappear as quickly as it reappeared. Tonight I will show it to the boys and see if they remember it. After that it will go up as art work in their room. Probably hung at a level where it can still be "used" to enter their new lair. It's sentimental to no one else but us...but boy does it now have an even cooler story to go along with all our original memories of it.
Finding treasure in unexpected places,
Rachel B.
Wednesday, November 13, 2013
Tuesday, November 12, 2013
Couples Fitness Challenge
So for anyone who doesn't know my husband and I personally, we are really competitive with one another. Most of the time it's in good ways, some times it's bad. (Like the fact that we bet on pretty much every single presidential election...yeah...we're those kind of people.) It's always in good fun though which I think is important and we never get upset about losing to one another. (Unless it's scrabble...neither one of us EVER wants to lose at scrabble.)
 |
| How I look losing at Scrabble...lol |
Anyways...
Competition runs in our veins. Now this would be nice if we could harness it for something useful. 10+ years of marriage and that hasn't happened yet. Rewind to last night...we're setting in the front room and I make my all too frequent comment that I'm going to get up early and work out in the morning. Without missing a beat William scoffs at me and chuckles. Okay...so I say this a lot and never actually do it...so sue me.
I may have been feeling a little mischievous (with a capital M) when I turned to him and said "Oh yeah...why don't we have a competition..." and so it begins. After much deliberation about rules and dates and guidelines and such...and of course getting input from our facebook friends (who are probably shaking their collective heads at us right now) we finally settled on our latest game.
On July 1st 2014 (our 11 year wedding anniversary...YAY! We're still alive...lmao!) we will post "after" pictures of ourselves on Facebook. This will happen whether or not any change has occurred (so if we don't do any work we are up for some embarrassment). The catch is that we will be wearing a swimming suit that the other one picks for us. Can you say YIKES!!! I've already vetoed William's first choice. We do get some say after all.
I guess the good part about this is 1) we are putting our competitive energies to good use (my pictures are going to be way better than his...lol) 2) we are doing something fun together as a couple and 3) we are being held accountable for working out and staying healthy to a larger audience. My hope is that this will be a positive experience for both of us.
Now if only I could find a way to get up early and work out...
Rachel B.
Monday, November 4, 2013
The Very Hungry Caterpillar Game Review
My youngest son Gryphy is a huge fan of The Very Hungry Caterpillar. Last year I happened across the game around Christmas time and snatched it up. Before today we had only really played the game seriously once. Mainly because we tried playing it on Christmas day and there were other toys that commanded their attention. Since that time life has gotten busy and we have made attempts to incorporate family games into our routine but for whatever reason, this game migrated to the bottom of the pile. While the boys were doing homework I hopped into the game cabinet to see what I could pull out and this is what I settled on. Needless to say it was a huge hit! We only played one round but even Phoenix (who's 8) was asking for another round.
My overall opinion of the game is that its very simple. But most kids games are. The game is rated 3+ and I would say that is about right. However, if you have a Caterpillar obsessed 5 year old like I do then its still a great fit. My kids both love it and I am sure we will be playing it more in the future. It is only four players so if you have a large family it probably wont work so well. The majority of reviews I saw for it online were pretty negative, most focusing on the simplicity of the game. I disagree with them. Board games for kids should be simple, engaging and fun. This game is all three of those things. If you are interested in purchasing the game here is the link for it on Amazon.com. (Ahh...Amazon...) Although, I did not pay $18 for it at Toys R Us and I wouldn't pay that much. I bought it on a game sale during the holidays. If you can find it for less then I would recommend getting it. Your little ones will love it.
Here are some pics of my two little birds enjoying post homework game time...
Mommy for the win!! Poor Phoenix finally pulled ahead two spaces from the finish only to have me roll the magic number 4 right after him. I asked him to give me his angriest "how dare you face"...this is what I got...lol.
The game ended and led to an impromptu reading session. Yay for books!!
Happy Learning!
Rachel B.
My overall opinion of the game is that its very simple. But most kids games are. The game is rated 3+ and I would say that is about right. However, if you have a Caterpillar obsessed 5 year old like I do then its still a great fit. My kids both love it and I am sure we will be playing it more in the future. It is only four players so if you have a large family it probably wont work so well. The majority of reviews I saw for it online were pretty negative, most focusing on the simplicity of the game. I disagree with them. Board games for kids should be simple, engaging and fun. This game is all three of those things. If you are interested in purchasing the game here is the link for it on Amazon.com. (Ahh...Amazon...) Although, I did not pay $18 for it at Toys R Us and I wouldn't pay that much. I bought it on a game sale during the holidays. If you can find it for less then I would recommend getting it. Your little ones will love it.
Here are some pics of my two little birds enjoying post homework game time...
 |
| Gotta love the chipmunk look of concentration...lol |
 |
| Uh Oh! Grypy pulls ahead of bubba! |
 |
| Its neck in neck... |
 |
| So close to victory, yet so far away... |
The game ended and led to an impromptu reading session. Yay for books!!
Happy Learning!
Rachel B.
Defiying Nature: Growing Tomatos Indoors in the Winter
Living in the Pacific Northwest has its upsides and its downsides. On the upside, you absolutely cannot beat our outdoors. There are so many trails and natural oddities just within 100 miles of where I live that it would take a lifetime to explore them all. On the downside though, we really only have two seasons, Spring and Fall. Anyone who tells you we have a Summer is lying. Summer does not exist here. Our short seasons and mild weather leave me firmly planted in Hardiness Zone 6B where the growing season runs from about May to August. Granted this is largely dependent on rain levels. We get an outrageous amount of rain every year. One year I planted my garden at the end of May thinking it would be safe from rain storms and it was drowned out within a week. Sigh* So needless to say, being November right now, the growing season is over...or is it?
Right around the beginning of October I got a huge case of cabin fever, which I normally don't get until around January. While rummaging through the house upending and re-potting any plant I could get my hands on, I stumbled across an old packet of tomato seeds. I figured, why not try to grow them indoors. I had never tried that before but I have a great south facing window that gets full sun all day long so I went with it. It is now November 4th and my little indoor gardening experiment is paying off. I have 11 tomato plants growing in my windowsill. Yesterday I had to transplant them into their own little containers. I took pictures of this process but for whatever reason everything turned out blurry even though it looked fine on my viewfinder, so I apologize ahead of time.
Here are the pictures of the transplanting adventure:
To begin collect your supplies and sprouts.
For transplanting I used plastic cups, a bowl full of dirt, a knife and some scissors. The mason jar full of white stuff is crushed egg shells. Rumors in the gardening world has it that the calcium in egg shells is like crack to tomato plants so I've been collecting them for a while.
After you have your supplies, look through your sprouts and determine which ones you want to use. From there, prepare one plastic cup for each sprout. To prepare the cups puncture a hole in the bottom for drainage and then fill with dirt.
Next, take a long something or another (I used a paint brush) and swirl it in the middle of the cup to create a deep hole for the plant. You want it to be deep enough that you can fit all of the roots into the hole and the plant.
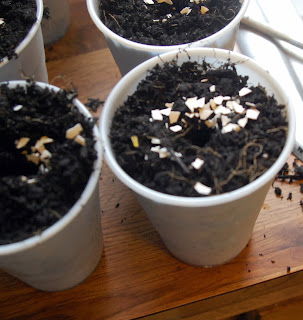
If you have an egg shell collection, add them now. I sprinkled them into the bottom of the hole so that the roots could get the calcium from them.
Next carefully take the sprouts that you chose out of their original container. The sprouts that grew in my tiny little flower pot actually had the best leaves. So these were the ones I transplanted first. You want to gently separate the plants so that you don't go ripping off every root. The object is to gently untangle the roots and separate the plants with as little damage as possible.
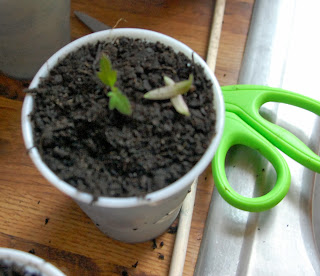
Once you have separated out the plants that you want, carefully tuck the roots of the plant into the hole followed by the whole plant. And by whole plant, I mean, you need to bury the plant all the way up to the bottom of the two smooth leaves.
Once you have buried the plant, cut off the two smooth bottom leaves from the plant.
Once you have done all of that, water the plants enough to wet the soil through and then find a nice sunny windowsill to put them in.
And there you have it...tomatoes in November. I am hoping that these will grow to be full on plants that will produce tomatoes for us over the course of the winter. Time will only tell though. I will be sure to keep everyone updated on their progress.
Happy Planting,
Rachel B.
Right around the beginning of October I got a huge case of cabin fever, which I normally don't get until around January. While rummaging through the house upending and re-potting any plant I could get my hands on, I stumbled across an old packet of tomato seeds. I figured, why not try to grow them indoors. I had never tried that before but I have a great south facing window that gets full sun all day long so I went with it. It is now November 4th and my little indoor gardening experiment is paying off. I have 11 tomato plants growing in my windowsill. Yesterday I had to transplant them into their own little containers. I took pictures of this process but for whatever reason everything turned out blurry even though it looked fine on my viewfinder, so I apologize ahead of time.
Here are the pictures of the transplanting adventure:
To begin collect your supplies and sprouts.
For transplanting I used plastic cups, a bowl full of dirt, a knife and some scissors. The mason jar full of white stuff is crushed egg shells. Rumors in the gardening world has it that the calcium in egg shells is like crack to tomato plants so I've been collecting them for a while.
 |
| Sprouts (about 3 weeks old) and crushed egg shells |
 |
| Recycled dirt |
 | ||
| Plain ol' plastic cups for potting containers |
After you have your supplies, look through your sprouts and determine which ones you want to use. From there, prepare one plastic cup for each sprout. To prepare the cups puncture a hole in the bottom for drainage and then fill with dirt.
 |
| Hole in cup for drainage |
Next, take a long something or another (I used a paint brush) and swirl it in the middle of the cup to create a deep hole for the plant. You want it to be deep enough that you can fit all of the roots into the hole and the plant.
 |
| Paint brush stick used to create hole in dirt for roots and plant |
If you have an egg shell collection, add them now. I sprinkled them into the bottom of the hole so that the roots could get the calcium from them.
 |
| Egg shells crushed into dirt |
 |
| Baby tomato plants...aren't they cute!! |
Once you have separated out the plants that you want, carefully tuck the roots of the plant into the hole followed by the whole plant. And by whole plant, I mean, you need to bury the plant all the way up to the bottom of the two smooth leaves.
 |
| Plant buried deep in the dirt. |
Once you have buried the plant, cut off the two smooth bottom leaves from the plant.
 |
| Snip, snip... |
Once you have done all of that, water the plants enough to wet the soil through and then find a nice sunny windowsill to put them in.
 |
| Happy plants sitting in full sun... |
And there you have it...tomatoes in November. I am hoping that these will grow to be full on plants that will produce tomatoes for us over the course of the winter. Time will only tell though. I will be sure to keep everyone updated on their progress.
Happy Planting,
Rachel B.
Subscribe to:
Comments (Atom)


